Japanese woodcut print on Shoji paper, 29 x 42cm, 2024
I love the transparency of Japanese printmaking papers. When I print on certain thin papers with very light diluted watercolour I am able to place other elements behind the print to create double or multiple layers of imagery. These connect with some of the ideas of dual perception I have been exploring in my research. I have been using 'dud' prints to experiment with this in the studio.
Using nori paste as an adhesive, I stretched the printed Shoji paper over my lithograph print. The graphic black of the lithograph becomes a grey shadow beneath the thin abstract marks of the Japanese print. In this experiment I wasn't taking much consideration of the specific images, I was more interested in the quality of the technique. For me, it's useful to know that it works practically. It opens up ideas for photographs layered under prints, a possible physical interpretation of my digitally-layered photographs.
Lithograph on Somerset paper with Japanese woodcut print, 29 x 42cm, 2024
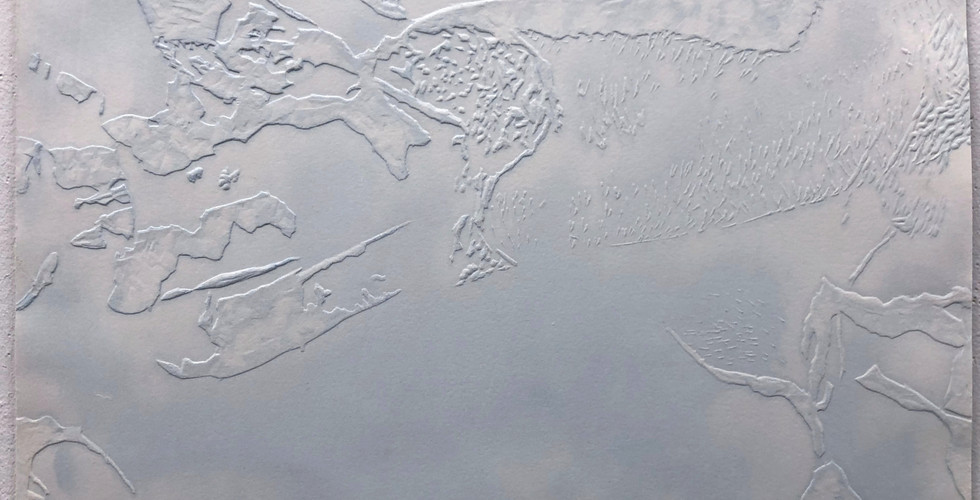
In a later workshop, in which I was introduced to photographic transfer, I tried to use the technique onto another trial woodcut print. The process involved printing the photograph onto acetate, then using hand-sanitiser gel to dissolve the photograph and transfer it onto the paper. The lines on the photograph occurred when the thin paper creased while I was rubbing the baren during the transfer process. Again, a very imperfect experiment, but I was interested to see Japanese print showing within the lighter sections of the photograph. I am increasingly seeking ways to bring the sharp reality of photographic imagery into the materiality of print.
Photographic transfer on Japanese woodcut on Shoji paper, 36 x 40cm, 2024
The London-based artist Lucas Dupuy creates these mixed media works by layering inkjet photographs onto abstract gouache paintings. I'm inspired by the way the photographs appear to be situated on their own plane from the painted canvas. They aren't embedded or floating above the surface; they are their own surface. I would like to see these in real life to understand if this is the real effect.
Lucas Dupuy, 'A For', gouache, inkjet and paper on canvas with wood frame, 100 x 80cm, 2021
Lucas Dupuy, ‘The sudden rush’ Gouache, Paper, Inkjet on canvas, 51 x 61cm, 2021
Dupuy's book, titled 'Formless Anxiety' has a really intriguing sense of layering in these dusty photographic compositions in which figuration is placed within geometric shapes, marks and shadows. As in the mixed-media paintings, there are multiple planes of imagery which lean back and forth between photography and abstraction, giving us a sense of the 'formless anxiety' of the title. Again, I would love to see this in reality but I can't trace a copy.
Lucas Dupuy, 'Formless Anxiety' 14.8 x 24cm, 264 pages - 80gsm Uncoated Holmen Book, 2023
Lucas Dupuy, 'Formless Anxiety' 14.8 x 24cm, 264 pages - 80gsm Uncoated Holmen Book, 2023
Lucas Dupuy, 'Formless Anxiety' 14.2 x 24 mm, 264 pages - 80gsm Uncoated Holmen Book
In the same workshop as the photographic transfer, I tried applying a monoprint layer to an unrealised Japanese print on Shoji paper. The large 'rock' form doesn't work at all, but I like the way the lighter marks begin to delineate some perspective in the print. Another experiment in layering which might evoke some more painterly possibilities.
Monoprint and Japanese woodcut on Shoji paper, 36 x 40cm, 2024
I had created some blind embossed works previously using deeply etched sugarlift plates, and I enjoyed the sculptural quality it gave to paper. My intention now was to use my carved woodcut plates to emboss into some of my existing mokuhanga prints. I was interested to see how I could create a new 'layer' of physicality to my prints.
Close-up of the hydraulic press
Woodcut for my first embossing
I backed my prints onto dampened Somerset paper using diluted nori paste, rather like a chine collé. I hoped this would give enough stability for the Japanese paper to emboss but not tear under the pressure of the press. My first prints were badly registered, but they excited me as the form cast by the embossing did indeed create a new 'layer' to the print.
Embossed Japanese woodcut print, 25 x 15cm, 2024
Embossed Japanese woodcut print (detail), 25 x 15cm, 2024
Embossed Japanese woodcut print, 23 x 19cm, 2024
Embossed Japanese woodcut print (detail), 23 x 19cm, 2024
Embossed Japanese woodcut print, 23 x 19cm, 2024
I'm interested in the idea of the print as an object. Manipulating the surface of the print in this way creates a new material physicality which disrupts the image and the way we view its surface. In my research I have been considering how I might bring the matrix into play with the print itself. In the first print-embossing titled 'Things', the matrix, ie. the woodblock, is from a different print, so the embossing interrupts and fragments the image. The off-centre registration is unfortunate, because the effect becomes too obvious.
In 'Bones', the series of purple prints above, the embossing is created by the print matrix, so the 3D forms seem to both connect with and interrupt the print. I don't see these as any more than experiments at this stage, but process interests me. Perhaps the embossed mark could be more subtle; one or two lines which serve to delineate sections of the print, like an aerial view of an archaeological site in subtle relief from the existing landscape.
I experimented with pressing brass foil into my woodcut block using the rounded end of a paintbrush. I would like the emboss to be as accurate as the paper experiments so I will try to use the hydraulic press with a layer of foam to see if this would press the metal into the relief.
I lightly inked my large woodblock with an icy blue watercolour and used the hydraulic press again to emboss into damp 600gsm Somerset. I was worried the paper fibres would stick, but the embossing worked well. It reminds of how I feel when I am carving the block: as if I am creating landmasses and archipelagoes.
Embossing with ink on Somerset paper, 45 x 36cm, 2024
Embossing with ink on Somerset paper (detail), 45 x 36cm, 2024
I would like to scan this print; reprint it as a 2D digital print onto Japanese paper, back it onto the same 600gsm Somerset and emboss it again. I like the idea of form depicted within the 2D print image, and 3-dimensional form within the physicality of the paper. In this way I can continue exploring the print as object and experiment with how this can play with our perception.
When I focus on this cropped section of the print I can see it as a series of shadows and highlights, which might sound obvious, but each form has a white section and a black section, and in its 2D form this is the information the artist requires to draw this form, or this illusion of form. Going forwards, I will continue to find ways of incorporating the sculptural quality of the matrix into my print. I have explored this further in my writing: 'The Matrix in Printmaking'.
About 6 months before starting the Masters, I learned Japanese woodcut and developed a steady practice of printmaking at home. I have been working on prints which are created through printing multiple layers of watercolour which build gradually from light to dark. I work by tracing colour layers from photographs and seeing how forms emerge gradually out of the paper. I find the process very challenging, mainly because I feel I am still learning how to make a good print. I make a lot of mistakes which sometimes are caused by impatience, but often are just one of the many seemingly crucial factors including: paper too dry; paper too wet; wood too dry; wood too wet; too much nori; too little nori... All of these vary depending on the paper used as well, and I have started to slowly learn what works best.
The photograph I worked from shows part of a sculpture of a lion from around 600BC. I had been interested in photographing stone objects because I love how the forms emerge from the homogenous material. The light and shade gives it form. I also like the object-ness of hands and feet and when photographed on their own they seem odd and vulnerable in their design.
The homogeneity of stone also provides a form on which I can layer colour and light from other photographs. These are often film stills with bokeh and abstract light patterns which I like to layer on top of my photographs using Photoshop.
digital photograph, 2024
I start multiplate prints by drawing out each stage in a sketchbook, then testing watercolour layering to plan how I can build the print from light to dark. These sketches become messy colour swatches as I test paints throughout the printing process.
Sketchbook pages planning each woodblock and testing colour layering, 2024
Ink testing in sketchbook
Next, I sized and printed the photograph to fit the dimensions of my woodblock. In this case I had chosen to create a dauntingly large print; large compared to what I had been doing.
I then used carbon paper to trace, firstly, the white sections of the print onto my first woodblock. I work on tracing paper with the photograph beneath, then the carbon paper; this way I can create a coloured 'map' of the print as I go.
tracing the main composition from the photograph
planning the 2nd block
planning the final block
The artist who taught me Japanese woodcut, Carol Wilhide Justin, had spoken about about some of the difficulties of creating large prints. Her prints from the Royal College of Art are genuinely huge (some nearing a metre long) and she described the physicality of working on the floor and having to devise ways of rolling and laying the paper out during registration.
Justin Wilhide, Carol. Not Yet. 2017, Japanese Woodcut on Bunkoshi, 90 x 60cm
My woodblock measured 36 x 45 cm. I cut my white shoji paper to 57 x 46 cm. This meant that the 'damp pack' which is used to dampen the paper had to be big enough to fit the prints. I ended up stapling 12 x A1 sheets into a 'booklet', brushing water onto alternate pages then keeping this within a large polythene sheet.
sketchbook page detail
I felt confident tracing each layer onto the 4 woodblocks and I love the cutting process because I feel my skills improving with every print. Beyond this, the inking and printing process was probably the most challenging print I have ever done. It seemed as if nothing was working. The nori paste was causing brush marks to appear on the print; this is often the case when there is too much nori, but using less caused the watercolour to bleed too much into the paper. The ink was too faint in the first layer and too dark in the next. I found registration almost impossible because the thin damp and huge piece of paper was so floppy and delicate to handle that I couldn't seem to line it up within the registration without it being sometimes a centimetre out.
All of this, and feeling very 'on show' as I'd sprawled my work over the room, I started to feel quite anxious and very demoralised. Probably the most difficult time on the course so far as I'd put so much time into planning and making this print, expecting exciting things, and I was worried I had wasted my time.
1st block with design transferred in carbon paper
cutting the 1st block
trouble-shooting in the studio: ink too dark, nori dried out, not enough ink/pressure
I ended up taking everything home with me and trying to make the print again in my familiar working space, away from other eyes (as it felt at the time). Pete was helpful in suggesting that the nori paste was drying too quickly due to the large area I was printing, and my brush being too small. He suggested I purchase some good quality shoe brushes which would allow me to apply the nori and ink much more quickly before it dried -- and it began to work! I added some extra cardboard guidelines on my registration plate and devised a way of registering which involved weighting down the paper on the two left corners of the registration, allowing me to stretch the paper taut over the block. I was also able to spread out and lose the sense of anxiety I had been feeling, which meant I began to enjoy the process again.
my registration plate made from cardboard
applying watercolour dabs with a brush, before using shoe brush (shown) to rub it over the bloc
laying the prints out on my bed when complete
prints in progress, 2024
My experience of creating these prints have made me reflect on my own investment in the graft of the process; the effort of making, in this case, hand-cutting. I don't find the cutting process particularly difficult or at all tedious. In fact, I enjoy using the knife to carve each section and the chisel tool to clear; I like the way it allows me to focus solely and at the same time to zone out. In trying this larger print, I found myself concerned with how much time I was taking over the cutting process, and this within the timeframe of the Masters led to me consider ways to quicken up. How would it be to laser cut all or some of my woodblocks? How important is the quality of the hand-cut line? How important is it for me as an artist to create my woodblock by hand?
Japanese Woodcut print on Shoji paper. Paw. 2024 4/5 (36 x 45cm)
Aspects of Japanese woodcut printing that I love: The thinness of the paper that lets the light through; the transparency of the ink, and the way forms can be depicted as if they are emerging through the layers. The traditional process which is non-toxic and which can be created at home without a press. I like that they are unusual prints; to me they have a slight photographic quality, but they also have a fragmented look, like islands.
I love the distinct quality and colouration of photographs; the focus and blur of depth of field, and strange light effects which only photography can evoke. I enjoy the challenge of evoking photographic quality in my prints, often through a sense of abstraction rather than of realistic depiction. Light is very important, and the sense of capturing form through light and shade.
Between writing this and creating my Paw woodblock prints, I have been learning how I can separate colour tones in photographs by using the Colour Range tool in Photoshop. This allows me to split the photograph into its highlights, midtones and shadows. In doing so, I could plan each layer of the woodblock digitally and either trace each layer and hand-cut or use the laser cutter to do the work for me. I don't think I would create a woodcut entirely using the laser cutter, but I am interested in employing a combination of digital woodcut and hand-carving.
'Paw' digital photograph, 2024 (edited to show highlights only)
'Paw' digital photograph, 2024 (edited to show midtones only)
'Paw' digital photograph, 2024 (edited to show shadows only)