- Jan 14, 2025
Updated: Jan 28, 2025
Transformations through process and material: A 3 Day image-making project
Taking the image on a journey, back and forth across analogue and digital languages, using processes, media and materials - disrupting the image and shifting meaning.
The history of image making through technology - from the pencil as mark on paper, to technology of printing, to emergence of photography, through early daguerreotypes to digital screens and VR and AI – how do we encounter the image – the inter-relationship between image/object/surface - how do we ‘read’ the image in relation to its surface/form/space?
(Text from workshop resource, 2024)
MA Printmaking participated in a 3-day workshop alongside the students from MA Drawing. We were instructed to bring an A4 printed image with us on the first day, which would be the starting point on a journey through various forms of image manipulation. I couldn't decide on one image so I chose two photographs from my Deconstructed Relics series.


Drawing and Photo Collage


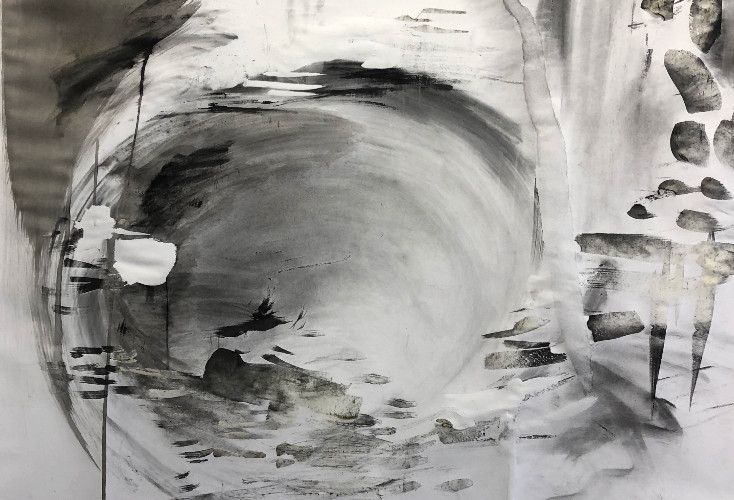


On the first day of the workshop, we were provided with drawing materials and paper with which to draw from our image. I realised how much I had missed drawing as soon as I had taped my large piece of paper to the wall and gathered charcoal, brushes, indian ink and masking fluid. I was interested drawing in the feathered quality of the colour photograph resulting from the distortion of objects through textured sheet glass.
I cut the large drawing into two smaller works and re-taped them to the wall. I wanted to incorporate the relic form from the second black and white photograph, so I cut the oval shape along with smaller pieces from the photograph and began to play with collaging on top of the two drawings.


My next step was to use the 'stencils' of the cut out photographs to frame sections of the drawings, acting almost like viewfinders. I photographed these and printed them as new works. For me, they work much better as 2D prints, because there is an ambiguity about their form due to the layering of their parts.


Monoprint
I used Photoshop to split the colour photograph into its highlights, mid tones and shadows. I was then able to alter the hue of each of these and then drag them all back together again to form the photograph, which had a much more painterly quality than the original.


We were shown how to use the press to create layered monoprints. In retrospect, I wish I had used these digital colour separations more as a guide for painting each layer. However, as an experiment in creating a painterly monoprint and transforming my original photograph, I was fairly pleased with the outcome.


I am very interested in printing on to photographs as I love to create works which have a glossy realism combined with the printed/painted mark. Monoprint allows for layering in far looser, freer and quicker way than woodcut.
In the work on the left I have combined the photograph with the monoprint.
In accurately colour-mixing from the edited photograph, the monoprint works as an expressive 'other' to the photograph. Both work on different planes, but have a shared perspective due to the edges of the mirrored worlds lining up. Again, I find the works most effective when they combine photographic imagery with the painted/printed mark.